 It's time to scrap. Do you know where your photos are?
They might be on a collection of SD cards, a camera, your phone, a hard drive, or even a set of CD's.
Are you using an organizing system to keep track of all those pics? Well, if you aren’t, don’t feel guilty!
I'm here to show you how finding photos to scrap can be easy, using Photoshop Elements Organizer.
If you are starting from scratch it may be even easier for you using the new and improved organizing system in Photoshop Elements.
Photo organizing is a little simpler than supply organization, because most digi scrappers have fewer photos than supplies. I'll walk you through the new, simple way that Photoshop Elements Organizer handles photos.
Photoshop Elements has several 'rooms':
- Media - a full listing of all your photos and videos
- People - where you can view and tag people in photos
- Places - a hybrid map and photo view
- Events - where you can group photos by events
You can search across all the rooms and also use tags and albums to get more specific in your photo management. Inside this article, I'll be focusing on the most common photo management questions to help you get started organizing your photo library, without hours of tagging and moving folders around.
Before you Begin
You may want to create a separate new catalog for your photos, so that it's quicker and easier to manage your photos separately from your supplies. I spent a couple of years with everything in one catalog and on an older computer it struggled to manage everything.
 To create a new catalog:
- Select File - Manage Catalogs.
- Click New.
- Type a name for the catalog in the "Enter A Name For The New Catalog" dialogue box.
- Click OK.
To switch between catalogs:
- Select File - Manage Catalogs.
- Select the catalog from the list in the Catalog Manager dialog box.
- Click Open.
I often start with my Photos catalog open, then after sending the photo to the Editor (Right click, then Edit in Photoshop Elements), I change to my supplies catalog to pick out my supplies.
If you have an older computer, you may want to turn off Auto-analyze.
- Select Edit - Preferences - Media-Analysis (Windows), or Adobe Elements Organizer 11 - Preferences - Media-Analysis (Mac OS).
- Deselect Analyze Media For Smart Tags Automatically.
I leave Auto-analyze faces on for my photos, but turn everything off for my supplies catalog.
Old Photos
Importing photos into Photoshop Elements Organizer is simple.
For existing photos that you already have on your computer, or external drive, simply drag the folders over onto the main Organizer window.
You can also use the Import button or File - Get Photos and Videos - From Files and Folders...
If you are using iPhoto to manage your photos, you can import them into Organizer too. You simply find the Import button. Click on it, and choose From iPhoto. Here's the details, thanks to Adobe.
Remember, Organizer will not move the files, it just links over to the file already located on your computer. See the first article in this series for more details.
New Photos
By default, when you install Photoshop Elements, the Adobe Photo Downloader will run whenever you plug in a camera, or a card with photos on it.

- Click the dropdown box that says: Get Photos From.
- Then choose a location to store your photos by clicking the Browse button.
- Choose any additional options for subfolders (I like to keep mine by Shot date - meaning all the photos taken on one day will be stored in one folder).
- Choose if you want to keep or delete the photos. The first time you try this, select After Copying, Do Not Delete Originals. When you are confident with the system you may like to select After Copying, Delete Originals to free up space on your SD card.
If the Downloader doesn't open, you can import photos from your camera by clicking on Import - From Camera or Card Reader...

Automate it please!
If you are like me, and keep forgetting to download your photos, you need an Eye-Fi card. This special SD card has a wireless antenna so that whenever you are in range of your Wi-fi at home, and your computer is on, your photos start downloading automatically.
It is magic! I've written an article about the Eye Fi card for Big Picture Classes, so I won't go into great detail here.

- Plug in your Eye-Fi Card to your computer and select the settings to automatically download your photos (and upload to Flickr if you like).
- Put your Eye-Fi card into your camera.
- Update your camera settings (if needed, check your camera model here).
- Note where the pictures are stored (C:\Public\Pictures, for example).
- Add that folder to your watched folders list in Organizer.
I've used my Eye-Fi card for over a year and love it.
Do you have one of these?

If you have a smart phone, you will want to add the photos you take to Organizer.
In our house we have an iPhone, two Windows 8 phones and an Android, but all the photos end up in Organizer, without any cables, syncing or fussing.
iPhone and Android: Dropbox to the Rescue
You can have Dropbox Camera Upload automatically upload all your photos, whenever you are on Wifi. Kimberley K explains how to do this over at Capturing Magic.
- Set up Dropbox Camera Upload on your phone.
- Set up Dropbox on your computer, and note where the Camera Uploads are stored (C:\Documents\My Dropbox\Camera Uploads, for example).
- Add that folder to your watched folders list in Organizer.
Please note, if you use an iPhone, you could use iCloud to do this. However, the iCloud software only imports photos, not videos. So that's why I suggest you use Dropbox.
Windows Phone
If you are using a Windows Phone - I'm excited I'm not the only one! You can use OneDrive to upload full resolution images to your OneDrive. See details here.
- Set up OneDrive on your phone.
- Set up OneDrive on your computer and note where the pictures folder is (C:\Users\Username\OneDrive\Pictures).
- Add that folder to your watched folders list in Organizer.
Automatically adding phone photos to Organizer is simple in Windows, just add a watched folder.
Mac users, please let Adobe know you'd love to get watched folders too! In the mean time drag your photo folder into Organizer and it will import the new photos.
Making Organizer do the heavy lifting
So now all your photos are within Organizer, the fun begins! You have a range of tools that will help you create.
Who's there? People and Face Recognition
I often like to browse through photos of my daughter over her 4 years so far, or find a photo with say, my parents and my son together, and with the People room, that's easy to do.
Organizer has a built in face recognition engine, and can connect with Facebook to provide you with a pre-populated list of names. Note: No face recognition data is share between Facebook and Organizer, it is purely a list of names.
Click on the People room button located at the upper middle part of the workspace. (Click on any image for a larger version)

To add people, click on the "Add People" option on the lower middle part of the workspace.

PSE will then group the photos by person. At this stage, you can add names of the people from your photos.

To have the option of adding names by referring to your Facebook friends list, click on the Download/Update Facebook friends list to name people button and follow the prompts. This will save you a lot of typing!

Just continue to click on the save button and Organizer will take you through several screens as it's learning to recognize faces. You can cancel at any time and the applied faces will stick. Just in case you don't want to sit and add names to 10 000 photos at once!
You can select just a portion of your photos in the Media room then click People to add names to just those faces. As you go through the process, Organizer will learn what your friends and family look like and will gradually improve in face recognition.
You can add names to any faces left untagged in the media view at any time.

Where am I? Locate photos with Places
If you have a GPS in your camera or use location services on your phone photos, Organizer automatically adds them to a map. Though my camera doesn't have a GPS, the Eye-Fi card does, so that's bonus! This is perfect for finding photos of say, a trip to a landmark over a couple of years, locating photos taken at your parent's home or on a holiday to some exotic location.

Don't have a GPS or Camera Phone? Don't despair!
You can still use Organizer to locate your photos manually. I'd recommend you do this for a family holiday or trip away from home, rather than for every photo, as it could get time consuming.
Click on the Places room button.

A map will appear, click Add Places.

Select the photos which you recognize to have been taken from one place and enter the location in the search box.

Further specify the location by dragging the Yellow rectangle on the map.

And click on the Green Tick/Check Mark to confirm.
This should create a Red rectangle to indicate you have that number of pictures taken from that location.
In this case, we click on the red rectangle with the number 7...

and this will show us the 7 photos taken from that Location in the photo bin to the left.
You can also use this method to move the location of photos taken in that first minute or two before the GPS updates.
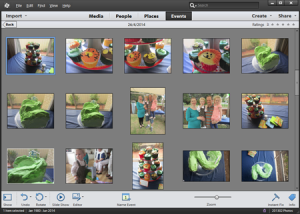
Party Time! Setting up Events
You can now have Organizer group your photos into Events automatically. I find this makes it easy to quickly add context to a group of photos.
Click on the Events room button located at the upper middle part of the workspace.
Turn on the Smart Events option.

Organizer will then group the photos by how it recognizes the photo's date.
To check, click on a group and you should see the photos under that group.

Go back to the groups and right click on the group to have the option to Name Event(s).

You can then add a Name to that event and a description.

You can head to the Events view to hide the smart events, and only the Events you've named and added details to will appear. This will prevent every backyard photo session being an 'event'.
Here's a little more about events from the Adobe Help page:
The time view helps you sort the media better on the basis of filtering images through timestamp of the photos. Once you are in the Smart Events tab in Events view, you can use the following features to form events based on time.
-
Group media by Date/Time: Select the Date or Time radio button to help Organizer prompt you the smart events based on the dates the photos were taken or the time of the day they were taken. For example, there could be multiple occassions like consecutive birthdays of colleagues or friends on the same day and you are looking to sort them as separate events in the Events view.
-
Use the slider: Click to select the slider and slide to further break the smart events. If there is a single event being displayed for a birthday initially, moving the slider further breaks it down to events stacks by the hours or minutes. Organizer forms these smart events stacks as per the bursts they were shot.
-
Calendar panel: The calendar panel displays smart events as per the date stamp of a photo or set of photos. Months during which photos are taken appear highlighted. You can double-click a calendar to expand the dates as per the month to view the smart events appearing on a particular day.
-
Albums/Folders: Click on a particular album or folder to view the smart events for the same folder in the Events view.
As you can see, this new feature is much more powerful than the old Events tags in Organizer 6-10.
You can easily remove or add photos to an event in the media view, under image tags in the info panel.

Star Ratings
In Organizer, it's simple to add a star rating to any picture. Just type 1-5 on the keyboard when you have that photo selected. Easy!
To find all your five star photos, just click on the stars at the top of the Organizer window. It will instantly filter your photos.

Add Captions and Journalling
If you want to journal in the metadata of your photos, just add text into the caption or notes field in the information panel on the right.

If you don't see it click on the More Info button at the bottom right of the Organizer.
To make sure the captions and journalling are saved into your photos, write your metadata to the files.
Go to File – Save Metadata to Files. This will allow other programs to see the tags you’ve applied to JPEG, PSD and TIFF images.
Keyword Tags
If all that isn't enough, you can add further levels of keyword tags to your photos. Since Photoshop Elements 11 was released, I hardly even feel the need to tag my photos, since the who, what, where and when are already covered.
There are lots of uses for tags, you can tag your picture 'to scrap', and then untag them or tag them with a 'scrapped' tag. Or you could add tags for items like specific toys, or a specific activity, like a sport or hobby.
Tag simply, to start with. You can always add more tags, but if you start trying to tag with too many details you’ll find yourself wading through an endless list of keywords with only a few items under each one.
A note about tags: In the PSE 11 Organizer the keywords, categories and subcategories you create are all contained in the Tags/Info panel in the Media 'room'.
The basic structure is:
- Keyword (top level)
- Category 1 (Second level)
- Sub-Category (third level)
- Category 2 (Second level)
You can drag and drop your tags around the structure.

Find it all!
 It's all well and good to get all your photos into the Organizer, but you need to be able to find them!
As you use Photoshop Elements Organizer you'll see that there is a myriad of ways to find things.
- Type a search term into the search bar at the top of the screen.

- Use the advanced search to search across all the 'rooms' (details below).
- Do a quick text search of the captions (Find - By Caption or Note...).
- Search by date, camera model and more in Find- By Details and Metadata.
Advanced Searching
To combine searches for multiple people, keywords or events in one quick search just head to Find - Advanced Search.
Then click the check boxes next to each item in the By default Organizer will make an 'AND' search which returns only the photos with all of the search criteria inside. If you right click you can choose to exclude certain tags from the search. This is really helpful if you are looking for a photo of two people at a certain location, for instance.

Setting up saved searches
If you are a fan of Stacy Julian's Photo Freedom or Library of Memories style photo management, you'll love the saved searches.
Simply set up a save search for each 'photo file' you want. For example, quickly find photos by season, so you can set up a saved search for each one.
Go to the Find menu, then click By Details and Metadata.

Enter in the following Search Criteria (click to see a larger image).

Be sure to select All of the Selection Criteria (AND)
- Capture Date is befor your date.
- Capture Date is after your date.
- Select Save this Search Criteria in a Saved search.
- Name: Season Name & Year.
Any time you want to quickly look through your saved search, click the magnifying glass in the search box, select Saved Searches and then click on 'Season Name & Year'.
If you have PSE10 or earlier, just go to your albums pane and click the album named 'Season Name & Year'.

Backup
Though I talked about backing up in Effortless Organizing in Photoshop Elements - here's a little reminder.
Photoshop Elements prompts you to backup your catalog – I suggest backing up to an External Hard Disk, if you have one.
I keep all my supplies on my main (internal) Hard Disk as I find it gives me faster access to the supplies and internal hard disks are much less likely to crash or die on you.
If you keep your supplies on an external drive, you can still use this method to back up to a second hard drive or burn DVDs of your supplies.
Go to File - Backup to CD, DVD or Hard Drive to start the backup process.
Send it to Photoshop Elements

So we now have a perfectly organized library, and we've got it all backed up. How then, do we actually scrap with our photos?
To edit your photos, or to scrap with them, simply right click, then select Edit in Photoshop Elements Editor.
You can send images one by one, or select a whole group to scrap with at once. Easy.
I hope you've enjoyed this series about Photoshop Elements Organizer, and I'd love to hear your questions. What is your biggest photo organization challenge?

I am an Amazon affiliate so may receive a commission if you make a purchase.
Leave a Reply