Digital Scrapbooking HQ

Learn to Scrapbook Using Your Computer

  • Blog
  • Classes
  • Book Melissa
  • About
  • Contact

Create a Cluster

April 16, 2014 By Melissa Shanhun Leave a Comment

Creating your own embellishment from digital scrapbooking supplies doesn't have to be complex and time consuming. Today I'll show you how I added a little custom embellie love to my baby boy's album.

Create a custom embellishment using your favorite digital scrapbooking supplies. Click for full video tutorial! #digiscrap #digitalkaren lewis silly billy kit

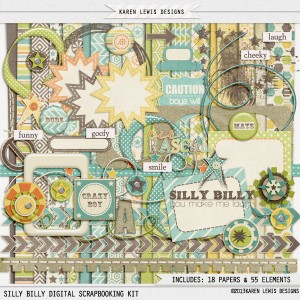
I used Karen Lewis Designz Silly Billy Kit to create a monogram embellishment for the first page of my little boy's baby album.

Want to create this yourself? Follow along with my video:

Or here's the how to in Photoshop Elements.

Step by Step

Set up the Canvas

Create a custom embellishment using your favorite digital scrapbooking supplies. Click for full video tutorial! #digiscrap #digital

  1. Create a new 300 dpi file the size you want your embellishment to be. I chose 5 inches by 5 inches
  2. Save your work as a Photoshop Document (PSD) file, which will retain all the layers of the embellishment so you can return to it later
  3. Open up a plain paper, patterned paper and ribbon to use in the cluster
  4. Drag them all onto the  new Photoshop Document (PSD).

Create the Base

Create a custom embellishment using your favorite digital scrapbooking supplies. Click for full video tutorial! #digiscrap #digital

  1. Give yourself a clear work surface by hiding all the layers in my PSD except the patterned paper.
  2. Click on the patterned paper to select that layer.
  3. Use the polygonal lasso tool to select a few hexagons from the patterned paper.
  4. Create a new layer via Copy (Ctrl+J Mac Cmd+J). This will take only your selection.
  5. Click on the eye icon in the layers panel to hide the original paper.
  6. You have a fussy cut base for your embellishment.

Distress the Text

  1. Add the letters with the type tool (shortcut T) in a bold serif font  - I used Rockwell Extra Bold.
  2. Move the blue paper up in the layers panel to be on top of the text.
  3. Create a clipping mask (Ctrl+G Mac Cmd+G) and voilà my text is now a beautiful textured blue!
  4. To add some more distressing I created a new layer and then clipped it (Ctrl+G Mac Cmd+G)  to the text layer too.
  5. Use the brush tool to paint black around the edge of the letters.
  6. Changed the blend mode to overlay with an opacity of 40% to give a darker, inked look to the edge. The clipping mask means you will never ink anywhere except the letters. Easy!

Create a custom embellishment using your favorite digital scrapbooking supplies. Click for full video tutorial! #digiscrap #digital

Add Texture with Ribbon

  1. I clicked on the eye icon in the layers panel to turn on the ribbon layer and use the polygonal lasso tool again to select only a portion of the yellow ribbon.
  2. Create a new layer via Copy (Ctrl+J Mac Cmd+J).
  3. Repeat the process for a second piece of ribbon
  4. I clicked on the eye icon in the layers panel to hide the original ribbon.
  5. Using the move tool, rotate and move the ribbons till they look good to you.
  6. Add a digital staple and to 'fasten' them.

Finishing Touches

At this point I used Rosey Posey's shadow styles to add dimension to my cluster. But it wasn't quite looking finished. I had a little blank spot above EJ.

Create a custom embellishment using your favorite digital scrapbooking supplies. Click for full video tutorial! #digiscrap #digital

So I added part of Little Rascal rub on from the Silly Billy Kit:

  1. Select just 'lil' with the marquee tool.
  2. Create a new layer via Copy (Ctrl+J Mac Cmd+J).
  3. I clicked on the eye icon in the layers panel to hide the original rubon.

Adding it to the page

Create a custom embellishment using your favorite digital scrapbooking supplies. Click for full video tutorial! #digiscrap #digital

I simply selected the layers in my new embellishment and in the layer panel I used my right mouse button to click and then selected duplicate layers. In the dialog box that appears I selected my digital layout to add everything into my layout.

Then I linked all the layers (using the chain icon at the bottom of the layers panel) to keep it all together as I positioned the cluster on my layout.

How it all turned out

I was thrilled with how my cluster turned out, it was just the handmade touch I wanted. I added it to a page created with a template from Biograffiti.

Create a custom embellishment using your favorite digital scrapbooking supplies. Click for full video tutorial! #digiscrap #digital

Hybrid Hero?

If you want to combine a digital cluster with a paper layout, follow the steps above and instead of adding to a digital page print your finished embellishments on Epson Premium Presentation Paper and add it to your page with dimensional adhesive.

Not a fan of Photoshop?

You could create a similar embellishment
  • Fussy cut (or not so fussy cut!) some patterned paper
  • Add some letter stickers
  • Use some scraps of ribbon with a staple
  • Use part of a rub on to finish the look
Why not share a link your layout with handmade embellishment? I'd love to see your creativity in action.

Melissa1

See my favourite things in the Digi Scrap HQ Store at Amazon.

I am an Amazon affiliate so may receive a commission if you make a purchase.

Filed Under: Tutorials Tagged With: digital scrapbooking, embellishments, Karen Lewis Designz, Photoshop Elements

About Melissa Shanhun

Melissa Shanhun is a Aussie mum of four and avid digital scrapbooker. She loves to show others how fun and easy it can be to record your precious memories with tech tools like Photoshop Elements.

Leave a Reply Cancel reply

Your email address will not be published. Required fields are marked *

G’day! I’m Melissa


G’day, I’m Melissa, Aussie mum and digital scrapbook educator. I'm here to help you pair your photos with memories (and fun supplies!) and create your own photo books.
Click Here to Get Started

Search

Youtube

Join us on Facebook

On the Site

ABCs of PSE Adobe Photoshop Adobe Photoshop Elements affiliate Ali Edwards Becky Higgins Christmas Christmas Album Christmas layout ideas Christmas scrapbook Crafts December Daily December Daily Inspiration December Down Under Digital Scrapbook digital scrapbooking digital scrapbook pages Forever giveaway Holiday Faves interview keyboard shortcuts Lain Ehmann Nettio Designs photobook photobooks photo books photo editing Photoshop Photoshop Elements Photoshop Elements Organizer Podcast project life Project Life app PSE13 PSE2021 Scrapbook Scrapbooking Shutterfly templates tools Tutorial tutorials Week in the Life Workshop

Copyright © 2026 Melissa Shanhun 2011-2023

I wish to acknowledge the traditional custodians of the land I live and work on, the Whadjuk (Perth region) people. I acknowledge and respect the continuing Noongar culture and the contribution they make to the life of this city and this region.

Privacy policy

As an Amazon Associate I may earn from qualifying purchases.

We use cookies on our website to give you the most relevant experience by remembering your preferences and repeat visits. By clicking “Accept”, you consent to the use of ALL the cookies.
Do not sell my personal information.
Cookie SettingsAccept
Manage consent

Privacy Overview

This website uses cookies to improve your experience while you navigate through the website. Out of these, the cookies that are categorized as necessary are stored on your browser as they are essential for the working of basic functionalities of the website. We also use third-party cookies that help us analyze and understand how you use this website. These cookies will be stored in your browser only with your consent. You also have the option to opt-out of these cookies. But opting out of some of these cookies may affect your browsing experience.
Necessary
Always Enabled
Necessary cookies are absolutely essential for the website to function properly. These cookies ensure basic functionalities and security features of the website, anonymously.
CookieDurationDescription
cookielawinfo-checkbox-analytics11 monthsThis cookie is set by GDPR Cookie Consent plugin. The cookie is used to store the user consent for the cookies in the category "Analytics".
cookielawinfo-checkbox-functional11 monthsThe cookie is set by GDPR cookie consent to record the user consent for the cookies in the category "Functional".
cookielawinfo-checkbox-necessary11 monthsThis cookie is set by GDPR Cookie Consent plugin. The cookies is used to store the user consent for the cookies in the category "Necessary".
cookielawinfo-checkbox-others11 monthsThis cookie is set by GDPR Cookie Consent plugin. The cookie is used to store the user consent for the cookies in the category "Other.
cookielawinfo-checkbox-performance11 monthsThis cookie is set by GDPR Cookie Consent plugin. The cookie is used to store the user consent for the cookies in the category "Performance".
viewed_cookie_policy11 monthsThe cookie is set by the GDPR Cookie Consent plugin and is used to store whether or not user has consented to the use of cookies. It does not store any personal data.
Functional
Functional cookies help to perform certain functionalities like sharing the content of the website on social media platforms, collect feedbacks, and other third-party features.
Performance
Performance cookies are used to understand and analyze the key performance indexes of the website which helps in delivering a better user experience for the visitors.
Analytics
Analytical cookies are used to understand how visitors interact with the website. These cookies help provide information on metrics the number of visitors, bounce rate, traffic source, etc.
Advertisement
Advertisement cookies are used to provide visitors with relevant ads and marketing campaigns. These cookies track visitors across websites and collect information to provide customized ads.
Others
Other uncategorized cookies are those that are being analyzed and have not been classified into a category as yet.
SAVE & ACCEPT