It's easy to fix lifeless skin tones with the Guided Edits in Photoshop Elements. I'll show you how to get perfect skin tones in no time!
We are continuing to shower our photos with love this February!
Since Photoshop Element 11, back in 2012, we have had the ability to quickly edit skin tones with Guided Edits.
In recent versions, it's easier than ever, it takes just one click to fix your skin tones!
If you'd like to see it in action - here's a quick video tutorial for you.
Simply open Photoshop Elements
Click on the Photo Editor

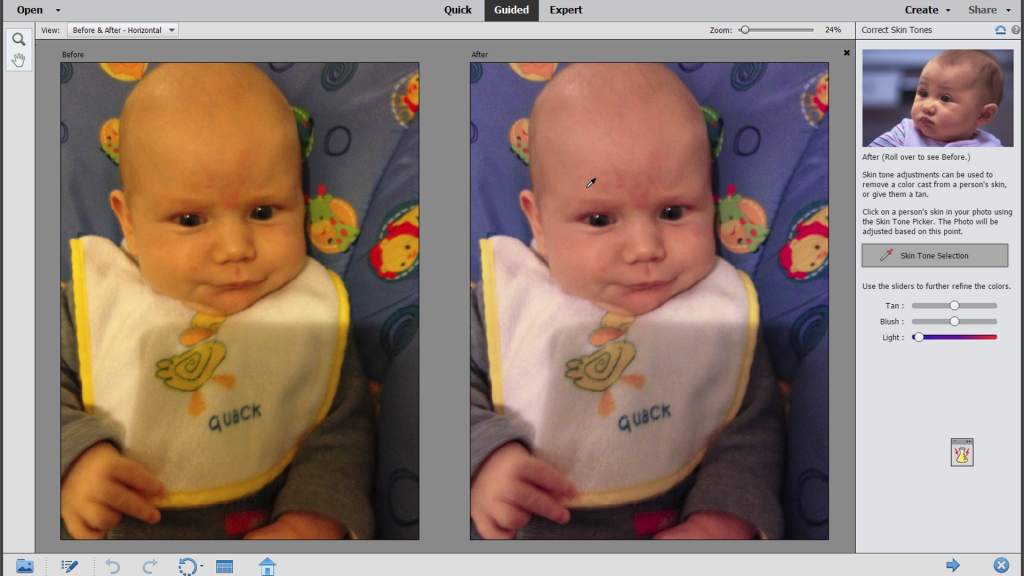
Select the Guided edit mode at the top of the screen and click on the Basics tab. You'll see Correct Skin Tone in the top row.

Use the Correct Skin Tone Guided Edit to correct skin tones in an image. You can view the after image only, or view both the before and after images either vertically or horizontally.

Simply select the skin tone with the Skin Tone Selection dropper and voila! Photoshop Elements does the adjustment for you! If you aren't happy with it you can adjust the sliders.
It's so easy, I did this edit in less time than it took to type out these steps!
Photo retouching, or editing sounds daunting, but it's not all that hard when you have the right tool. If you would like to learn more, head to my Fast Photo Fixes class.
What kind of photo edits would you like to do in Photoshop Elements? Do you have a photo that needs help? Email help @ digiscraphq.com for a chance to be featured in an upcoming video.
Happy photo editing!

PS Pin this for later!

I am an Amazon affiliate so may receive a commission if you make a purchase.

Leave a Reply