 Do you want to protect your images online?
One of the simplest ways to help deter image theft is to add a watermark to your images.
These days, photographers define watermark as text or images indicating the name or web address of the photographer, to indicate copyright and credit the photographer.
Sure, it won't stop people from stealing your photos and they could crop the watermaker off, but it will deter a lazy thief. It will credit your images to you, if they get pinned on Pinterest or shared on Facebook.
So how do I go about adding (c) copyright type watermark to multiple images in Photoshop Elements?
You may want to do this if you are uploading your photos on the web, so I thought I'd share this with you too!
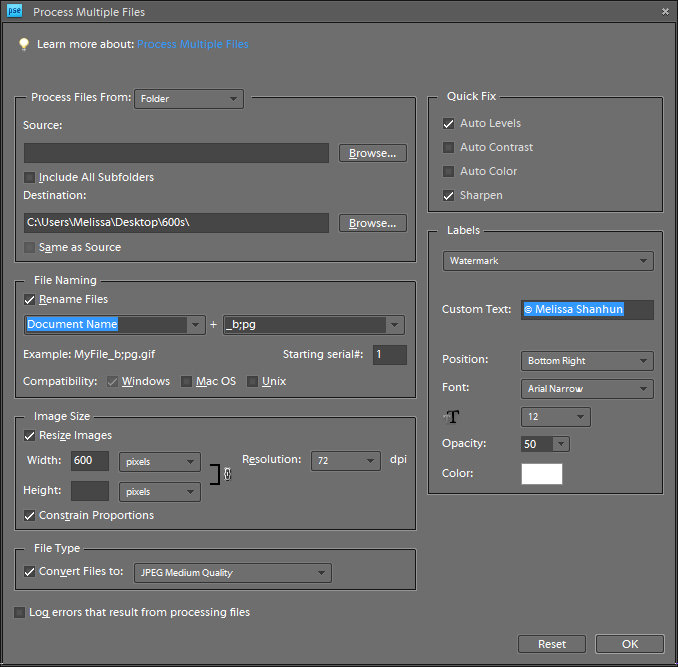
Using the Process Multiple Images feature in Photoshop Elements you can batch process your images and resize, add a water mark and more.
Creating a watermark
Watch the video or read on below for step by step instructions.
Step by Step
Go to the file menu - then click Process Multiple files.
- Navigate to the folder of images you want to process. (or open them first and work with the opened files)
- Put in the details of how you want to alter the images (resizing etc)
- Leave anything you want to keep the same blank
- Add your copyright message into the custom text box on the right hand side - see screen shot below (You can insert a copyright logo by typing Alt+0169 on the numeric keypad, or just copy and paste this one into the text field ©)

- Click OK
- Wait for Photoshop to process each of the files
- The resulting image looks like this:

So if you want to protect your images you don't need to do any manual handling, even in Photoshop Elements.
Just select a batch of photos or layouts, and go make yourself a cup of tea.
Happy watermarking!

I am an Amazon affiliate so may receive a commission if you make a purchase.
This is great Melissa! Do you also have tips for adding your own design of watermark, like a logo?
Hi Sonja – I’d recommend you create your own brush from your logo, then add a new layer and ‘stamp’ on the logo.
There’s no way to batch process that though!
That’s a good idea as my logo looks a bit like a round postage stamp. Too bad there’s no batch processing option then. Maybe PSE 13;-)
excellent tutorial, I am teaching myself how to use photoshop 11 to use on my blog and this is so easy to understand and follow, thank you so much!!
Thanks Carla! I’m glad it was helpful. 🙂