The first reaction many scrappers have to the thought of organizing their supplies is:
I could never sit there and tag all those thousands of files - I've got better things to do.
I agree! If I'm scrapping, I don't want to be spending time tagging. But I don't want to spend time hunting through messy folders either.
Leave tagging behind
Using the Photoshop Elements Organizer doesn't mean you have to tag every item in your stash for it to be useful.
It doesn't have to be all or nothing, and Organizer works with a wide variety of organizing styles.
Tag simply, to start with. You can always add more tags, but if you start trying to tag with too many details you’ll find yourself wading through an endless list of keywords with only a few items under each one.
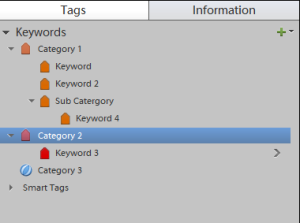
A note about tags: In the PSE 11 Organizer the keywords, categories and subcategories you create are all contained in the Tags/Info panel in the Media 'room'.
The basic structure is:
- Keyword (top level)
- Category 1 (Second level)
- Sub-Category (third level)
- Category 2 (Second level)
You can drag and drop your tags around the structure.
Leave folder organizing behind
 One benefit of a catalogue system is that all you need to do with your supplies is unzip them and tell Organizer to import them.
You can do that in one of four ways:
- Using watched folders to automatically import new supplies (Windows only)
- Dragging the new supplies onto the Organizer window (Mac or PC)
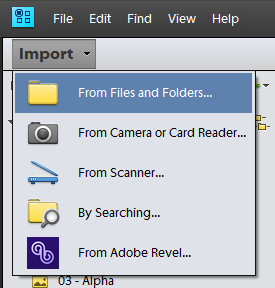
- Going to File - Import - From Files and Folders (Mac or PC)
- Clicking on the Import button (Mac or PC PSE11+)
Organizer does not require anything more complex that that. All the rest of the organizing is done within the program.
Now, I'd be lying if I said I just dump all my zips into one big folder and run Unzip Them All, but if you don't care how the folders look, why not try it!
What do I do next?
There are many different ways you can organize supplies, so before you get started, take a look a how some of our favourite scrappers organize and see which one appeals to you.
I've included instructions for how to get started with these methods along with downloadable tags to jump start the organizing process.
Let's start with Steph....
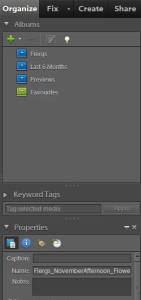
The Steph: Previews
Steph from Modern Photo Solutions, likes automation and doesn't want to spend all her time tagging. If you are a 'kit-scrapper' and you like the ease of scrapping with pre-coordinated kits, you will love this method of organizing.
Using PSE Organizer to tag your previews can be simple.
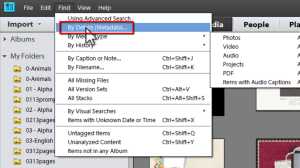
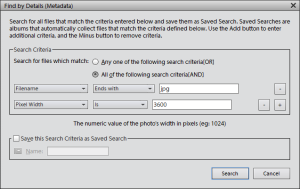
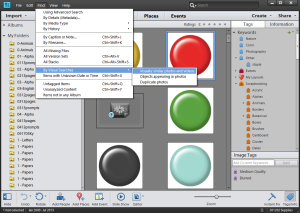
Go to the Find menu, then click By Details and Metadata...
Enter in the following Search Criteria (click to see a larger image):
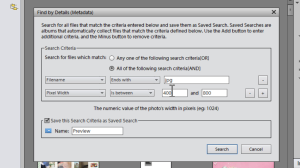
Be sure to select All of the Selection Criteria (AND)
- Filename Ends with .jpg
- Pixel Width Is between 400 and 800
- Select Save this Search Criteria in a Saved search.
- Name: Previews
Since most previews are smaller sized jpg files, we have found them all in one fell swoop.
If you just want to browse through your previews easily, then you are done!
Anytime you want to quickly look through your previews, click the magnifying glass in the search box, select Saved Searches and then click on 'Previews'.
If you have PSE10 or earlier, just go to your albums pane and click the album named Previews.
Want to get more specific?
Steph also adds some theme keywords to her previews. I'll show you how to do that as we look at other organizing styles below.
If you think you'll want more than just pulling up a nice collage of previews (newest to oldest by default), you may want to apply a preview tag to your previews.
- Select all the files that came up from the search (To select all, press Ctrl+A/Cmd+A on a Mac)
- Create a new keyword for Previews by pressing the green plus but on the top right of and name it "Previews"
- Then drag the "Previews" tag to the selected elements
Now, when you click on the "Previews" tag arrow on the right, you can see all your previews.
To find the related kit
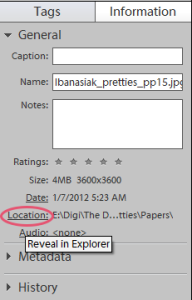
Once you have the preview you want to use selected, click on the Information tab in PSE11 (or go to Window - Properties in PS10 or earlier) and click on the File Location. Voilà, your folder opens with the kit contents inside.
Easy isn't it?
The Katie: Themes & Faves
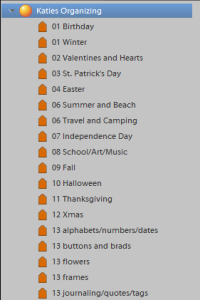
Katie described her folder system in the popular Digital Scrapbook Organization – 3 ways article.
I like how she used numbers to keep everything in order. Her holiday-themed items go in order by month number followed by numbered sections for types of supplies.
I've included a tag file for you with Katie's folder list, in case you'd like to replicate it.
Download 'The Katie' Template tag system to get started
Download just Katie's annual themes (1-12) here
You can tag your kits by theme quickly by just dragging tags onto the previews, and maybe a few of the more specific theme-y embellishments and word art (think Christmas baubles or four leaf clovers).
Keep it manageable by not over-tagging, remember you can easily find the kit the preview relates to by using the File Location link.
How to import tags
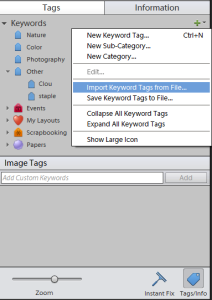
You can import these keyword lists by clicking on the green + button in the Keywords Panel and then Import Keyword Tags from File.
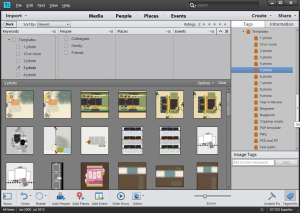 Template by number of photos
Katie inspired me to begin tagging my templates by number of photos.
First, find Templates by searching for:
- Go to Find and click on By Details Metadata...
- Select File name ends with psd
- Scroll through your templates and drag over tags for the number of photo spots on the template.
I have been using this system for years and love it!
Download 'The Katie' Template tag system to get started
Setting up a favourites folder
Katie also keeps a favourites folder of her go to supplies to make scrapping quick and easy.
You could simply:
- Create a new album for your faves
- Add items to the album by dragging them onto the album
- To see all your favourites, just double click on the album
The Ali: Find your type
Ali Edwards keeps her organizing simple and files supplies by type - all papers together, all frames together, all metal items together etc.
Though I don't recommend breaking up kits in this way in a folder structure (it's time consuming if you have a big stash), you can use keyword tags to keep it simple.
Here's a couple of example searches that would help you get started with Ali's method.
 Papers
- Find - By Details and Metadata... be sure to select an All of the Selection Criteria (AND)
- Pixel width 3600
- File name ends with jpg
- Tag by colour or pattern
- Ctrl+Click (Cmd+Click on the Mac) to select multiple papers at once
- Drag the paper tag (or colour tag, or pattern tag) onto the items
It has now found every single paper I have in my digital scrapbooking files (no, I'm not going to tell you how many that is!)
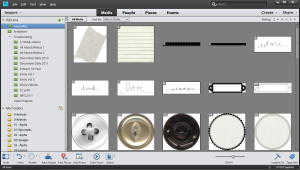
Embellishments
- Find - By Details and Metadata... be sure to select an All of the Selection Criteria (AND)
- File name contains flower (or button or ribbon etc)
- File name ends with png
- Ctrl+Click (Cmd+Click on the Mac) to select multiple embellishments at once
- Drag the flower tag onto the items
Download 'The Ali' tag system to get started
The Stacy: Scrap by Colour
Stacy Julian loves color! If you do too, you may like to organize by color.
In Photoshop Elements (and Picasa too) you can search by colour.
To start with, find one item in the colour you are looking for
Then do a visual similarity search:
- Click Find, By Visual Searches, Visually similar photos and videos
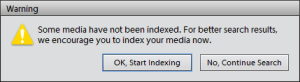
- Click Ok, Start indexing if prompted (and got have a cup of tea if you have a big collection)
- Drag the slider over to colour
- Your results will appear
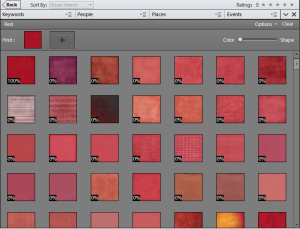
If you want to tag items by colour, set up a keyword for each colour (or download my samples!) and drag the items over onto the tag for each colour.
To find your pink papers, just click on the arrow to the far right of the Pink tag in the tags panel.
Simple!
Real life example: I tag only my papers by colour, I will look for a paper, find one I like then click on 'Show in Windows Explorer' to see the rest of the kit. Then I usually just scrap with that kit.
Download 'The Stacy' colour tag system here
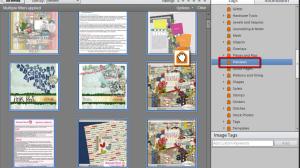
The Peppermint: Categorize it All
If you are like Peppermint Granberg, Debbie Hodge, Kayla Lameroux or me, you'd love to be able to pinpoint your supplies with accuracy and speed.
Using a combination of all of the above methods, you can tag to your heart's content and find all your Easter word art with two clicks of a mouse.
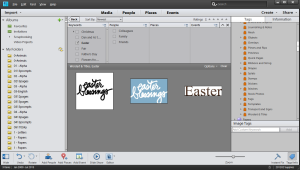
- Click on the arrow to the right of Easter
- Click on the arrow to the right of Word Art
- DONE!
If you are willing to use a bit more time, and some advanced searching and photo stacking, you can make your Organizer run like a super efficient supply discovery machine.
My most popular video ever shows more details of how I quickly find a variety of supplies.
Let's take a look at how I would search for all my alphas, and make it easy to browse through them all.
Alphas
- Find - By Details and Metadata... be sure to select an All of the Selection Criteria (AND)
- Add the search criteria
- File name ends with png
- File name includes alpha, lower or upper
- Tag, then stack your alphas to have less clutter! Go to Edit – Stack – Stack Selected Photos (or right click and then Stack Selected Photos)
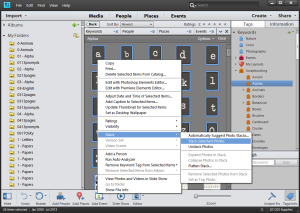
- To see individual letters and use them, simply click on the arrow next to the top image in the stack
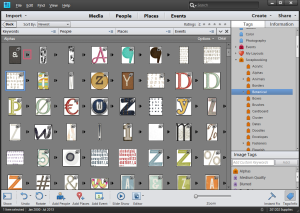
Now that is beautiful!
Download a starter set of the keyword tags for 'The Peppermint'
Help! I don't know where to start!
Not sure what system will work for you?
I suggest you download the Peppermint Starter tags. They are a simplified place to start and you can just add more tags if and when you need them.
If you don't want to use a tag you can just right click on it and delete it (it won't delete any tagged images) or ignore it.
Keep it Up
As with any system keeping up is the key. That’s why I encourage you to start simple with a watched folder and a saved search for previews.
Just having your supplies in Organizer makes it simple to find them.
You can always do a quick text search of the file names (Find menu - By Filename...) even if you aren't doing any tagging and search easily for designers by the name they use to prefix their files (eg Flergs, CSchneider, KRL).
If you want to tag, you can work on it whenever you have few minutes spare on the computer. Watching TV with your laptop alongside you? You can find untagged items by pressing Ctrl+Shift+Q (Cmd+Shift+Q on a Mac) and tag away.
Backup
Though I talked about backing up in Effortless Organizing in Photoshop Elements - here's a little reminder.
Photoshop Elements prompts you to backup your catalogue – I suggest backing up to an External Hard Disk, if you have one.
I keep all my supplies on my main (internal) Hard Disk as I find it gives me faster access to the supplies and internal hard disks are much less likely to crash or die on you.
If you keep your supplies on an external drive, you can still use this method to back up to a second hard drive or burn DVDs of your supplies.
Go to File – Backup to CD, DVD or Hard Drive to start the backup process.
What about you?
Are you a Steph, Katie, Ali or Stacy? Or maybe a Peppermint? I'd love to hear your take on these organizing ideas in the comments. Where's your organizing sweet spot?

I am an Amazon affiliate so may receive a commission if you make a purchase.
Melissa, this was a very informative post. I particularly appreciate all the different approaches to organization. I started using folders for organization 5 years ago and have about 60 different sub-files for types of elements alone. I am rather reluctant to ‘jump ship’ and switch to the Organizer entirely when I have invested so much time in my version of organization. Nothing is perfect however, as I am 8 months behind in ‘sorting’ to these files. (I don’t break up kits, just copy to files so you can understand why I have a 2TB EHD!)
That said, I would so love to organize my templates by type and number of photo slots and will definitely be trying that! Who knows, it just might drag me into total Organizer usage!
Questions about the term ‘album’ and ‘smart tags’. Would I create a new album when separating ‘digi’ from ‘templates’ say? I know everything is subjective here, but I was just curious if that is how and where I start my various digi files in Organizer. And what is and how does one use ‘smart tags’?
Thanks Melissa. You are a great instructor; I could listen to your beautiful Aussie accent all day long!
G’day Julie
Thanks for your comment 🙂
I use albums just for things that I want to manually keep is a special order. For eg all the layouts for one photobook.
Smart albums (now saved searches in PSE11) are better for supplies because they update automatically as you have more previews etc.
Smart tags are best for photos. Organizer generates them and makes them for photos with two people in them etc. You can turn them off but can’t really set up your own.
Does that make sense?
🙂 Melissa
Taking a quick peek into several ways that people organize was very interesting! Thanks, Melissa! Great job!
Hi Melissa
Thanks again for all of your info. I’m slowly getting there! I have a question about backup. I have three catalogues within PSE – my digi supplies, my photos and my church’s photos. If I do a backup from within one catalogue, does it actually back up all 3 or just that one that I was in? Thanks again!
Hi Alison – that will have backed up just the current catalog you are inside.
I usually name a subfolder for each catalog I’m backing up, otherwise it gets confusing!!
Thanks for getting back to me! I will make sure to back up each catalogue.
Wow their is alot to think about. I have yet to start scraping as I needed to organise my supplies first, then learn how to import them into PS to use. So I cant base my decisions on experience or style. If I use the colour method or themes can I still use my previews to access each kit if need be?
Hi Shannon
Since your supplies are already in organizer, why not try creating a few pages. You can browse or search for supplies without spending all your time tagging. Especially if you don’t know how you will want to search for your supplies.
To import them into PSE to use them, just right click on the item you want to use and Click Edit in Photoshop Elements Editor, from there you can start creating your page.
If you use colours or themes, YES you can still use your previews. That’s the beauty of it, you aren’t stuck to just one Organizing method.
But, please, take some time to scrap and play! 🙂 You’ll enjoy it!! 🙂