Do you struggle to add memorabilia to your scrapbook pages?
As a digital scrapbooker, sometimes I'm not sure how to add all that life stuff to my pages.
Sometimes I pop it one or two things into my photobooks, or bind it along with printed pages in a home made album, but what about getting those items into digital form?
In my video today, I'm going to share two simple ways to add memorabilia to a digital scrapbooking page.
If you have a scanner or a camera and Photoshop Elements (or similar editing software) you can follow along.
My Memorabilia Process
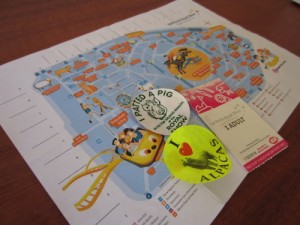
- Collect items and pop them in a plastic sleeve by approximate date to help me find it later.
- Scan flat items to include on my page and save the file along with my photos from that event.
- Photograph 3D items in natural light and save the photos along with event photos.
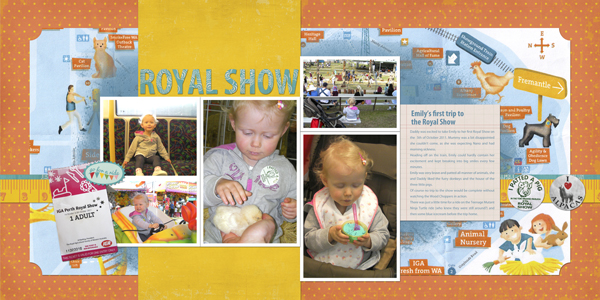
- Extract them for use on a digital page.
- Print and enjoy (and clear out some shelf space!).
Simple Memorabilia Tips
- Photograph your memorabilia on a plain, contrasting background if you want to extract it for use in a layout.
- Use a scanner to get clear text on flat memorabilia without messing with a tripod or photographer's lighting set up.
- Use the quick select tool to select and delete the background quickly.
- Help memorabilia fit as embellishments on your page by recolouring or just choose a kit that goes with the memorabilia.
- Don't fuss! If the memorabilia is a little creased up, it just adds authenticity.
Are you keen to see how I recoloured and adjusted the memorabilia to fit with my colour scheme? You can see more here.
If you are interested in learning some other extracting methods, you can read my extracting an image from a background tutorial. I cover several ways to extract an image in my Memorabilia workshop.

I am an Amazon affiliate so may receive a commission if you make a purchase.
This post contains affiliate links. This means that if you click through that link and purchase an item, I may receive a commission for referring the sale.
I only recommend classes and products that I know and trust. Thank you for using my link if you decide to purchase.
Melissa Shanhun is a participant in the Amazon Services LLC Associates Program, an affiliate advertising program designed to provide a means for me to earn fees by linking to Amazon.com and affiliated sites. As an Amazon Associate I earn from qualifying purchases.
I have recently moved from AU back to NZ and have only just found your tutorials online, I enjoy that you are not way across the other side of the world, and I can easily follow your tutorials. I am learning how to recolour elements etc, in the past I have not had much luck as they usually look like a coloured blob, however having found some tutorials recently I am getting there. Thank you for your great tutorials.
Thanks Christine! Have you seen this post? https://digitalscrapbookinghq.com/recolour-a-digital-scrapbooking-element/
Here’s another about recolouring https://digitalscrapbookinghq.com/change-colours-photoshop-elements/