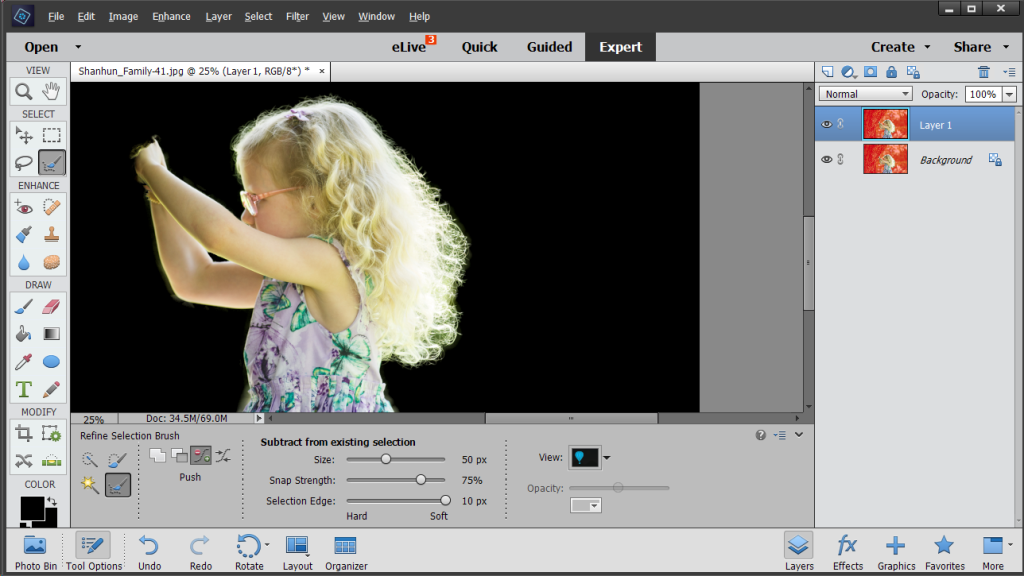
If you to make a precise selection in a photo, you'll love the Refine Selection Brush tool in Photoshop Elements 13 and 14.
If you used older versions of Elements you may remember the magic extractor, which auto-magically found the edges of the item you wanted to extract.
The refine selection brush helps you make precise selections. You can use them to edit specific areas of your photo - say where there's a shadow you need to remove or certain page elements. It is also helpful for creative scrappers who love extractions (erasing the background of a photo), or when you want to merge photos or papers.

The cursor for the Refine Selection Brush is an IMAGE of two concentric circles. The inner circle is the size of the brush, the outer circle indicates the area within which Photoshop Elements looks for an edge.
Four modes are available: Add, Subtract, Push, and Smooth
![]() Add: Adds areas to a selection
Add: Adds areas to a selection
![]() Subtract: Subtracts areas from a selection
Subtract: Subtracts areas from a selection![]() Push (the default mode):
Push (the default mode):
- Placing the cursor inside a selection expands the selection within the outer circle to snap to the first edge found.
- Placing the cursor outside the selection contracts the selection within the outer circle to snap to the first edge found.
![]() Smooth: Smooths the selection, making it less 'jaggy'. Yes, that's a technical term 😉
Smooth: Smooths the selection, making it less 'jaggy'. Yes, that's a technical term 😉
How to Use Selection Edit
This feature is a little more complex than some others, so I recorded a quick video to show you how it works.
- Make a selection using Quick Selection tool.
- Select the Selection Edit tool. Place the cursor inside the selection you just made, with the inner circle at the current edge and the outer circle at the point you want the edge to snap to.
- Depending on the mode that you selected in Step 2, the selection grows, shrinks or is fine-tuned as you move.
- Smooth your selection.
Precise Selections using Selection Edges
In the last version the
Refine Selection Brush made extracting and selecting specific parts of photos and supplies a breeze.
In Photoshop Elements 14, there's now the ability to further refine selections with the selection edge cursor. Selection edge cursor![]() will appear when you move your mouse over the edge of a selection and you can paint over the edge and Photoshop Elements will do all hard selection work for you. You can see the results in this picture of my daughter Emily's fine curly hair.
will appear when you move your mouse over the edge of a selection and you can paint over the edge and Photoshop Elements will do all hard selection work for you. You can see the results in this picture of my daughter Emily's fine curly hair.

So for those of you missing the Magic Extractor, give the Refine Selection Brush a try and see you you like it.
Happy selecting!

I am an Amazon affiliate so may receive a commission if you make a purchase.
Thank you, Melissa! I love your blog. This has been a harder tool for me to understand, but one I have great interest in. After you complete your selection what do you do? Copy and paste to another layer? Invert & Delete?
Hi Kim, you could do either of those, but usually I’ll mask the layer or use the selection to apply an adjustment (say levels) to just one part of the photo.
I really depends what you are trying to do.
I usually prefer a mask than a new layer in case I want to go back and add or remove bits of the picture.